
Off-Camera Flash 101: Setting Up Your Gear

Off-Camera Flash 101
Setting Up Your Gear
Written by: Mike Musto, Co-Owner of Evermore Imaging
One of the most commonly asked questions in our community is “What equipment should I get?” To help newcomers and pros alike, we’ve created a comprehensive list that you can find here.
However, simply acquiring the gear is only the beginning. We find that many people get discouraged when it comes to actually setting up their equipment. Some people even get so discouraged, they don’t end up using it at all. Not cool!
In our experience, we’ve found the Godox/Flashpoint system to be the best all-around choice for many reasons, so we’re going to show you today how to get started with your XPro trigger and V860 II speedlight!
We know the world of off-camera flash can be intimidating,
but we’re here to help get your started!
Method 1: XPro Trigger with off-camera flash(es)
Step 1: Attach trigger to your DSLR.
Place the trigger onto the hot shoe.
You’ll know there’s a successful connection when you see the camera icon at the top left of your trigger screen.
Step 2: Place your off-camera light(s) into “Radio Slave” mode.
“Radio Slave” mode means that your flash will not fire until it receives a signal from a trigger.
To place the V860 II speedlight into “Radio Slave” mode, press the furthest right button (two arrows icon), until you see the “Radio” icon and “Slave” on your flash:

Radio icon featured on top left, slave in center of screen.
Step 3: Make sure your channels match.
Your flashes and trigger have the ability to be use channels 1-32. This is designed to prevent someone nearby with the same brand trigger from accidentally popping your flashes. In order for your trigger to work with your flash the channels must match!
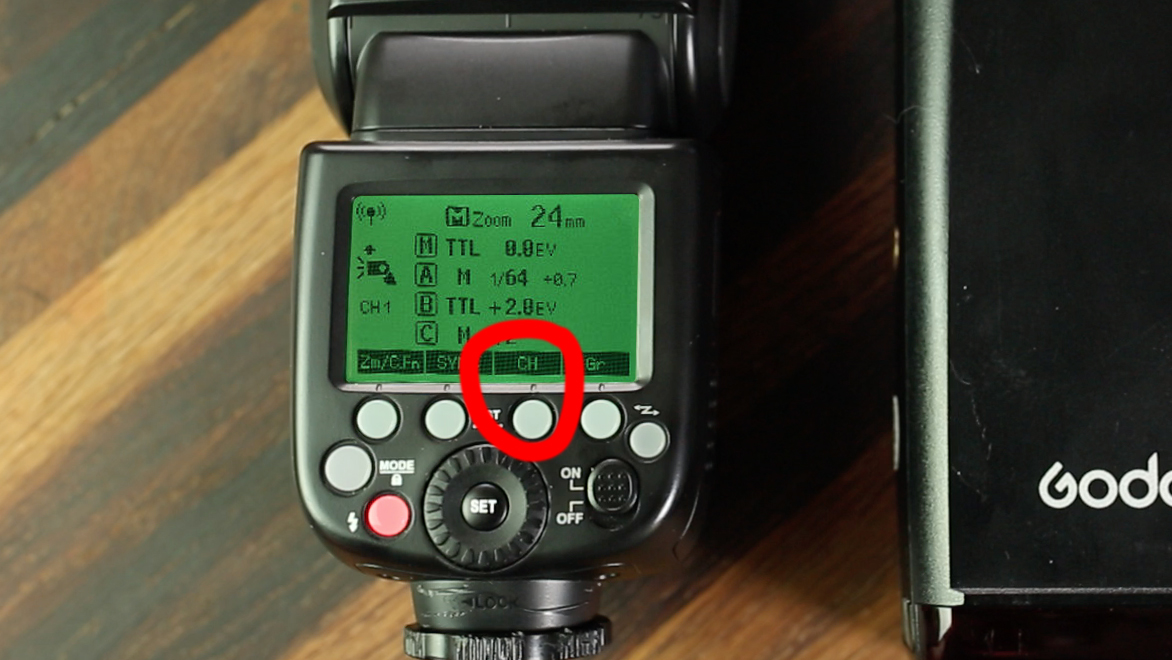
To change the channels on your trigger, simply press and hold the Zm/Ch. button. Then use the scroll wheel to select.
On your V860 II speedlight, use the CH button. Then use the scroll wheel to select.
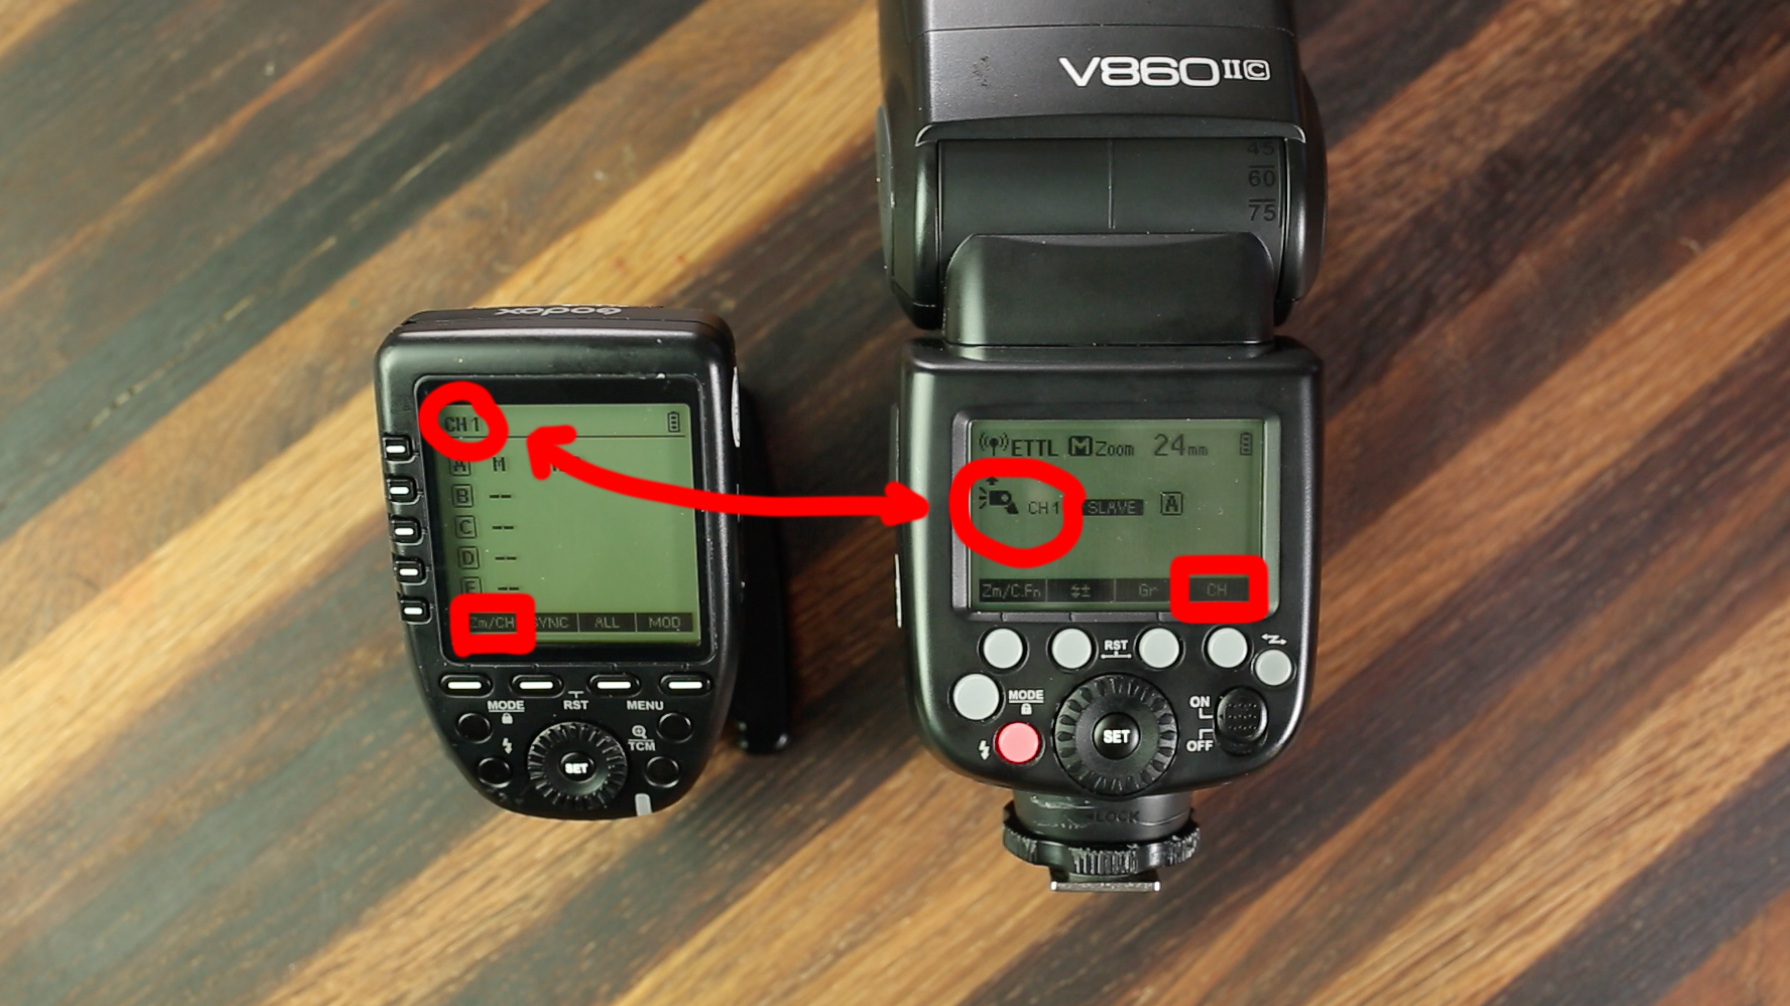
You can see which channel you’re on by looking at the top-left of your trigger’s screen. On the V860 II, you can find it in the middle-left of the screen.
Step 4: Make sure your groups match.
The last variable you’ll want to make sure matches is the Flash Group. The Godox system allows you to assign one or multiple “slave” flashes to a group, designated by the Letters “A-E.”
To enable triggering a Flash Group, on the XPro trigger, press one of the left buttons next to your desired letter, then select the “Mode” Button two times until you see the letter “M” for Manual Mode.
To assign your speedlight to a Flash Group, press the “GR” Button until your designed group letter appears.

Please note on the trigger, the physical buttons are located to the left of the screen.
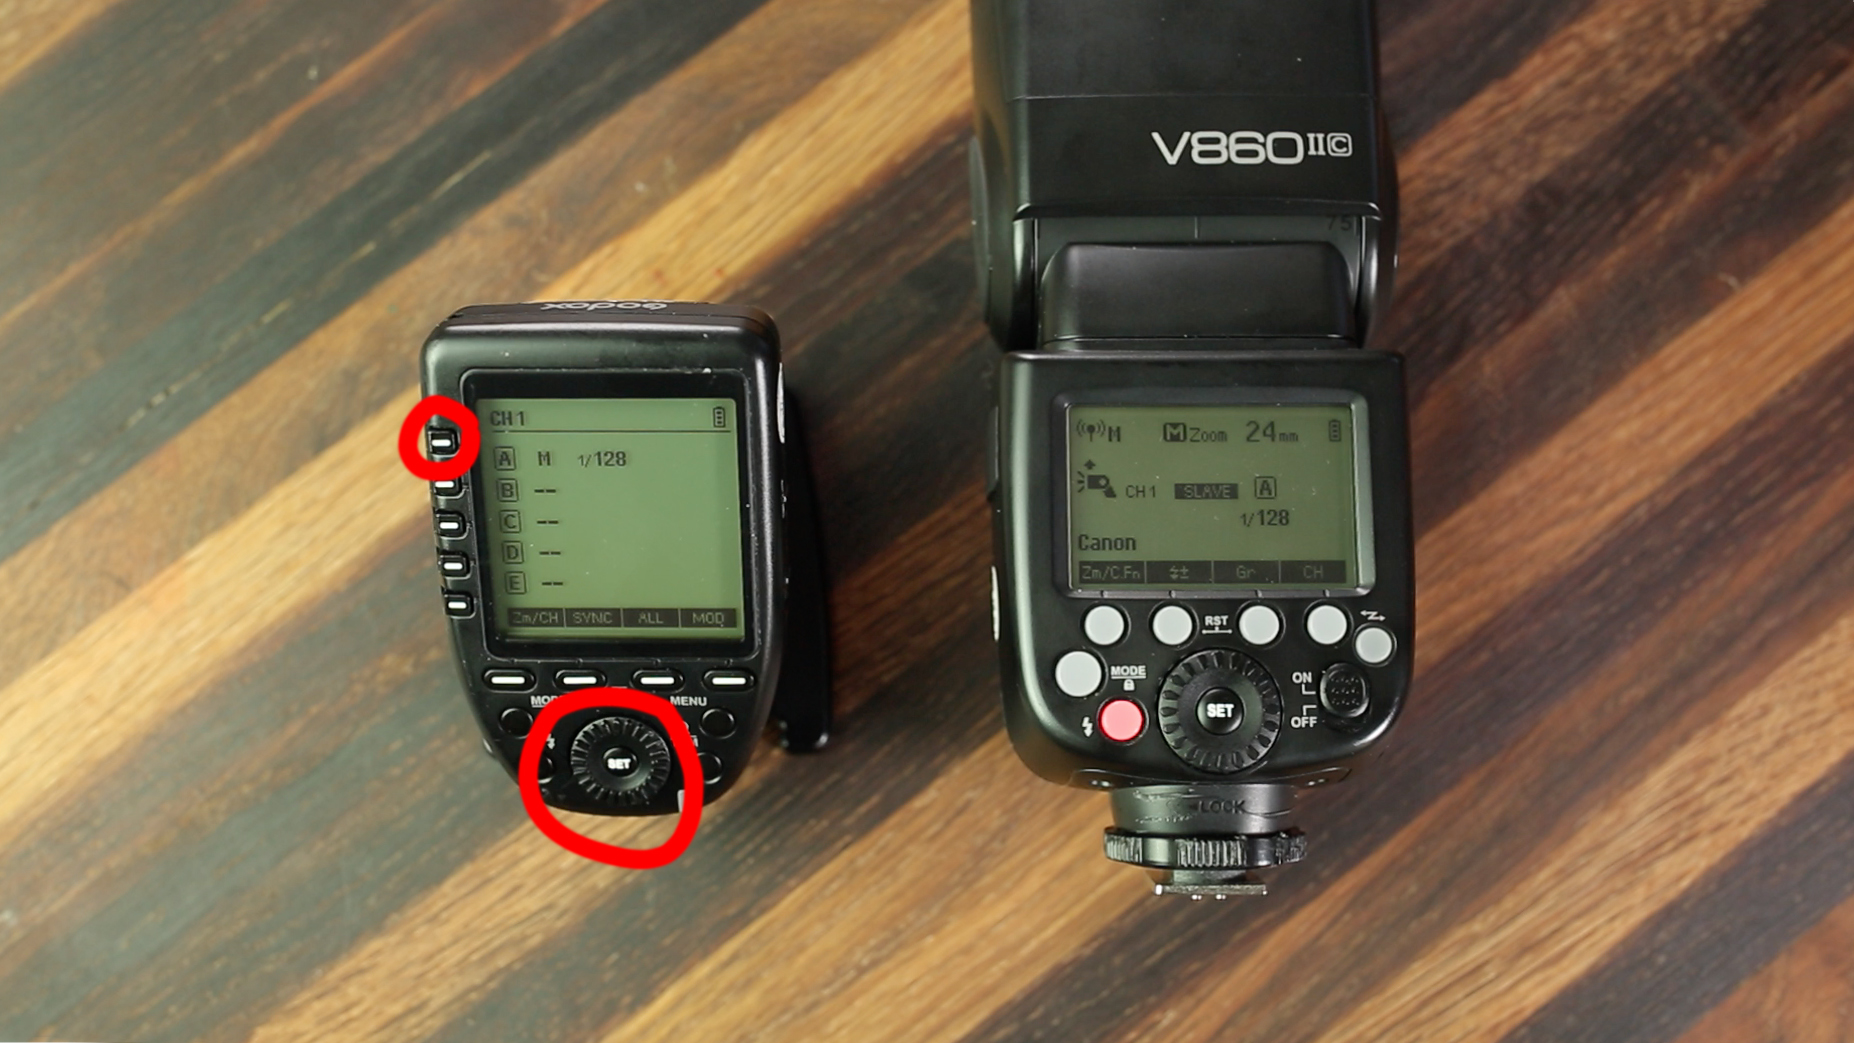
Step 5: Start shooting!
Press the test button (lightning bolt) on your trigger, your flash should now pop!
If for some reason it doesn’t, go back through the previous steps to ensure everything matches and is in the correct trigger mode.

Get ready to accept that fact that you’ll be blinded at least 5000 times when using off-camera flash. It happens to everyone!
Step 6: Adjusting flash power
To change the flash power of a flash group, simply press the button next to the desired group on your trigger and use the scroll wheel to adjust. Then press Set!
Method 2: V860 II master with off-camera flash(es) - CANON
Step 1: Attach V860 II [C] to your DSLR.
Thanks to the built-in transceiver, you will be able to use the V860 II as an on-camera “Master” flash. This means that it will also trigger off camera “Slave” flashes whenever it fires.
Step 2: Place V860 II into “Master Radio” mode.
To put V860 II into master use the furthest right button (two arrows icon), until you see the “Radio” icon and “Master” on your flash:
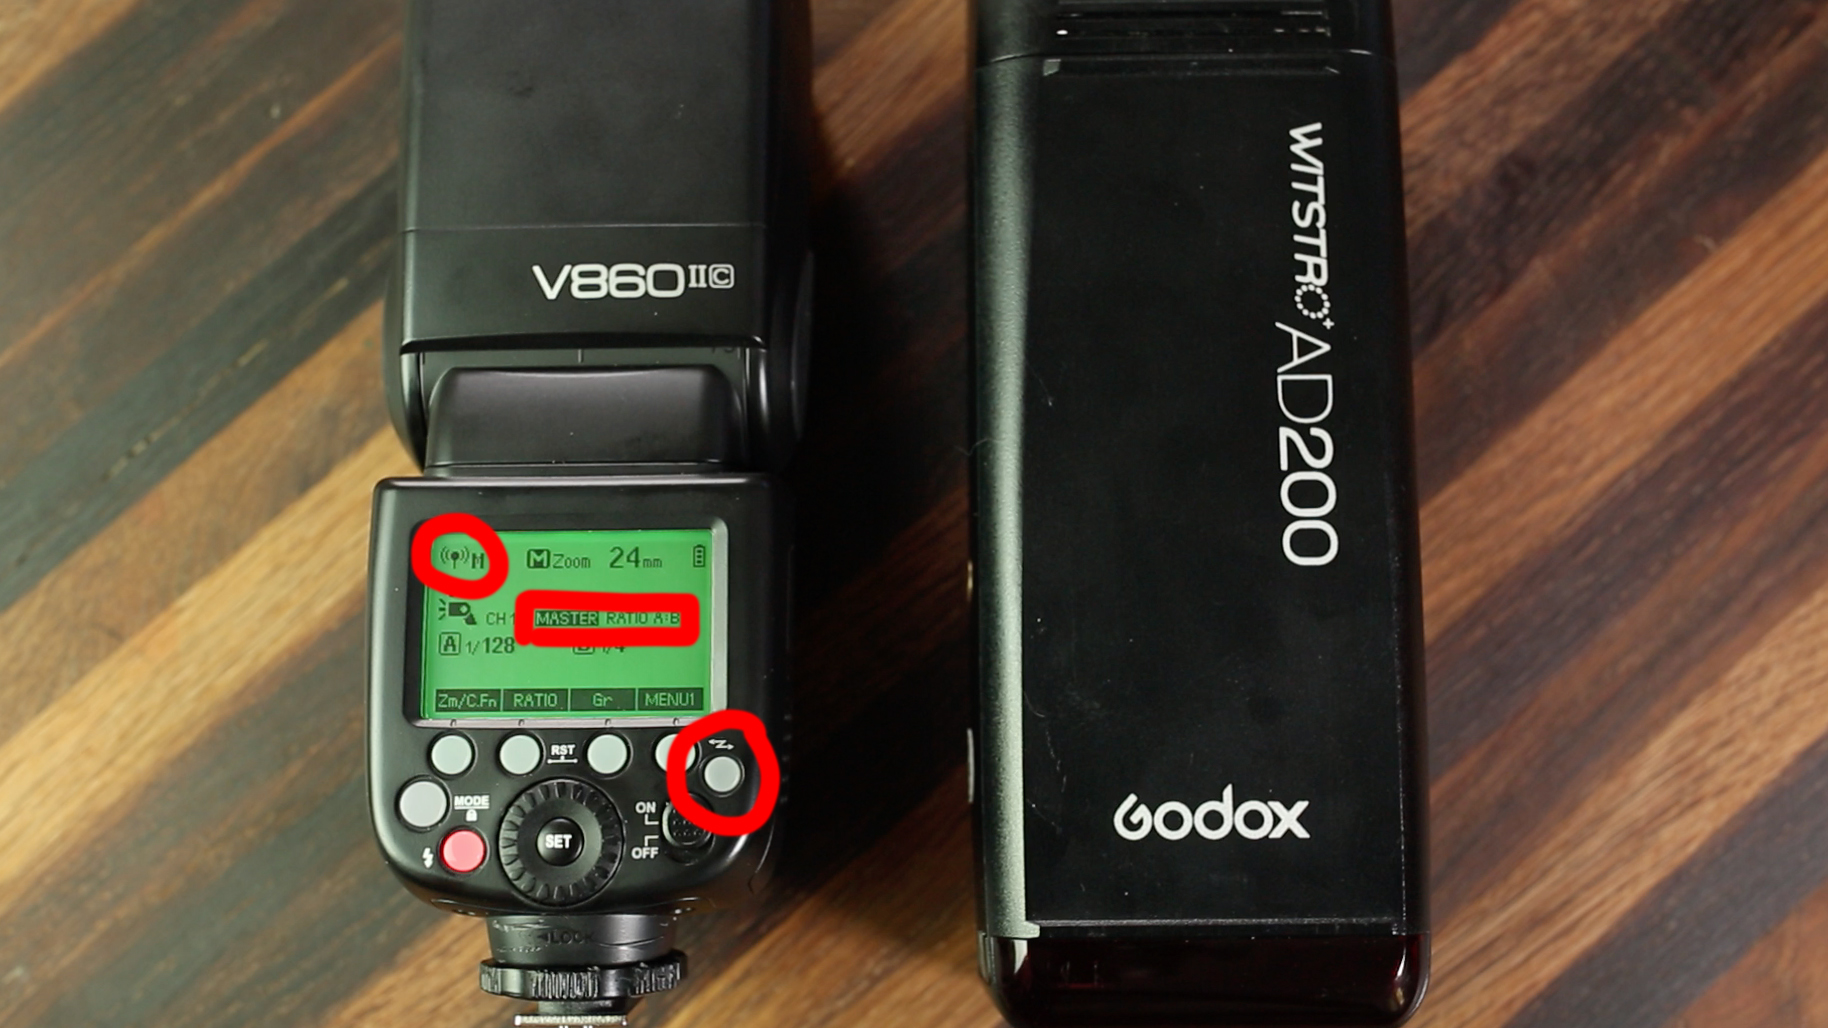
Note your screen will turn green when in “Master” and red when in “Slave.”
Note: if your “Master” flash is in ETTL mode, press the Mode button until you see “M” for Manual.

Step 3: Place your off-camera lights into “Radio Slave” mode.
To put the V860 II speedlight into “Radio Slave” mode, press the furthest right button (two arrows icon), until you see the “Radio” icon and “Slave” on your flash. (Step 2 in previous section)
To put an AD200 into “Radio Slave” mode, press the Mode button until the same “Radio” icon appears on the top left.

An AD200 in “Radio Slave” mode.
Step 4: Make sure your channels match.
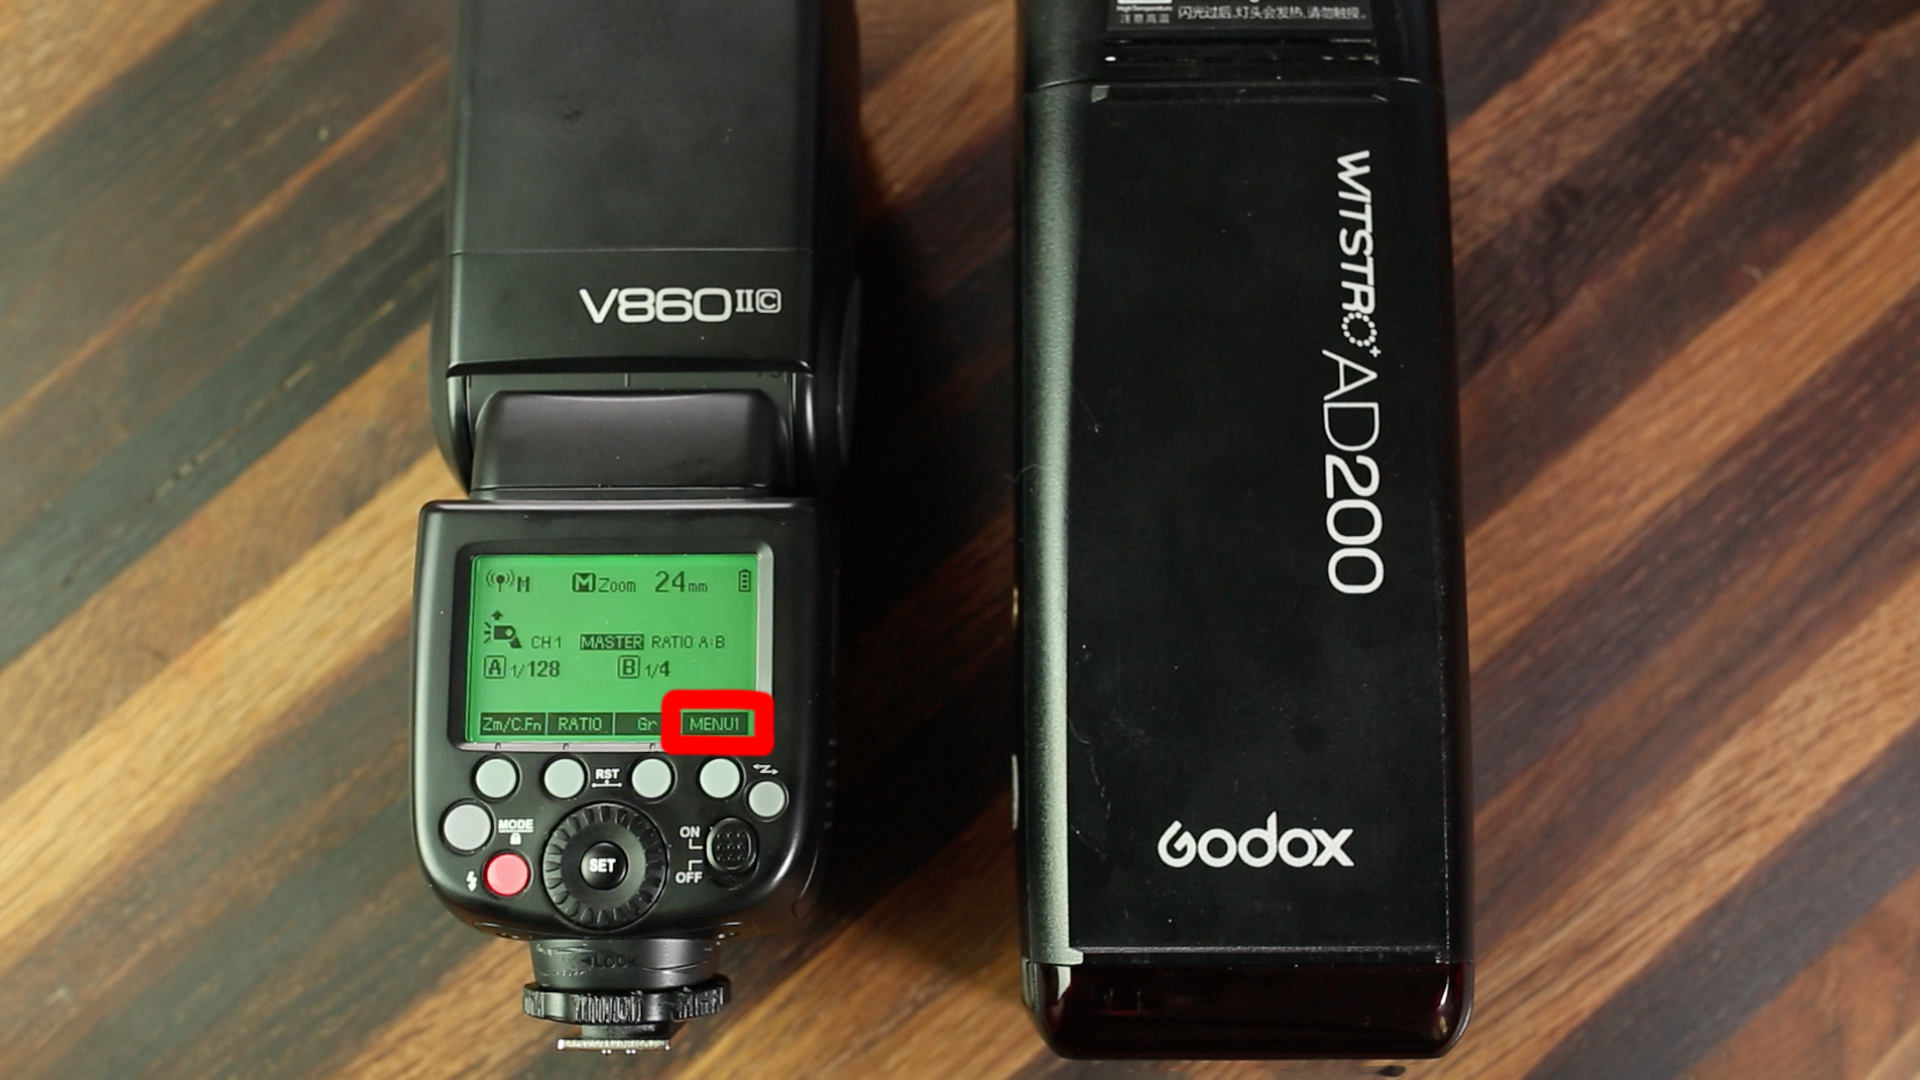
To change your “Master” V860 II’s channel, press the Menu 1 button, until you see a CH button. This will allow you to change the channel you’re triggering on.
To change your “Slave” V860 II’s channel, use the CH button. (Section 3 in previous section)
To change an AD200’s channel, press and hold the GR/CH button and use the scroll wheel to select.
In order for your “Master” flash to work with your “Slave” flashes, the channels must match!
Step 5: Assign “Master” and “Slave” flash a matching letter group.
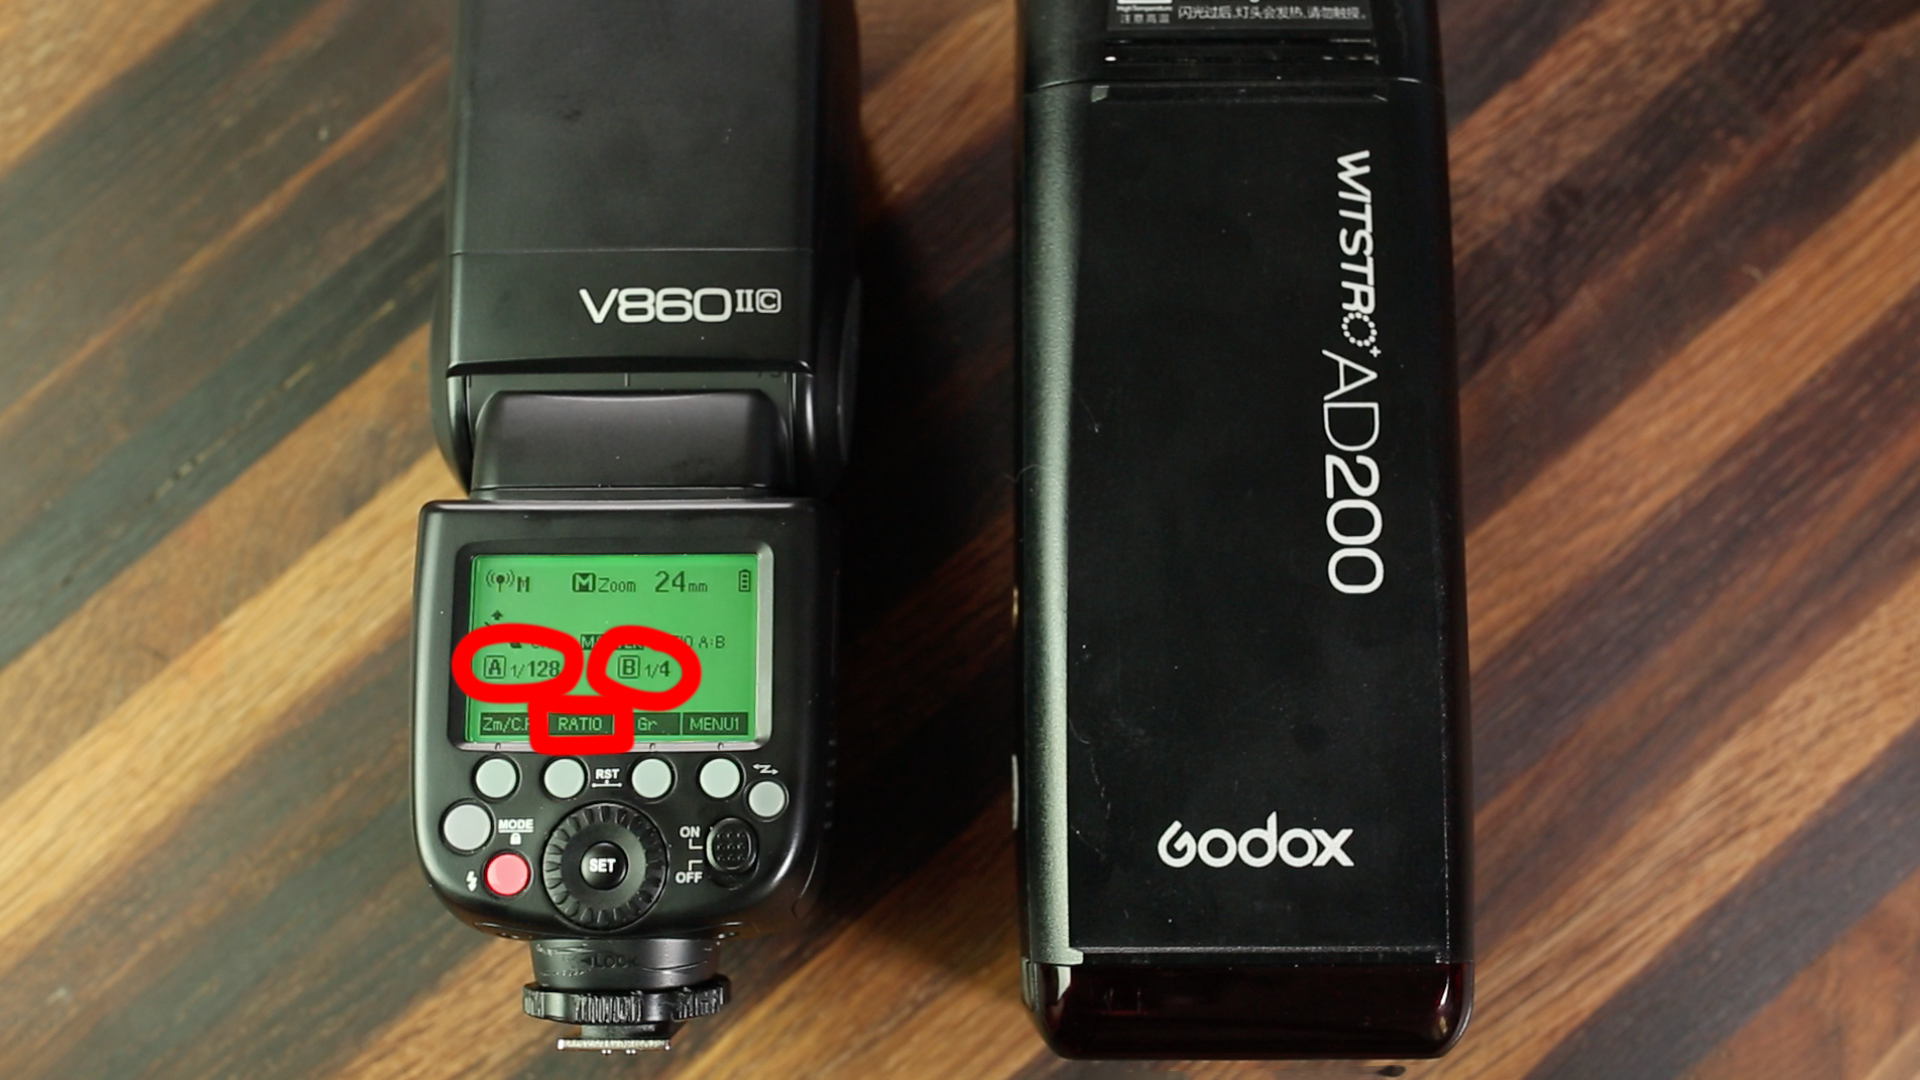
On the Canon mount V860 II, the on-camera flash will always be assigned to group “A”. We recommend having your off-camera flashes on groups “B” and “C”.
To activate the multiple groups view, press the RATIO button on your “Master” flash, until group “B” appears. Press RATIO twice to enable group “C”.
To assign your “Slave” speedlight to a Flash Group, press the “GR” Button until your designed group letter appears.
Step 6: Start shooting!
Press the test button (red indicator light) on your “Master” V860 II, your on and off-camera flashes should now pop! If for some reason they aren’t communicating, reference the previous steps to ensure everything matches and is in the correct trigger mode.
Step 7: Adjusting flash power
To change the flash power of a flash group, press the “GR” button until the desired group is highlighted. You can now use the scroll wheel to adjust the power.

Method 3: V860 II master with off-camera flash(es) - NIKON/SONY
Step 1: Attach V860 II [N] or [S] to your DSLR.
Just like the Canon version, you will be able to use the Nikon and Sony V860 II versions as a “slave” or “master” flash.
Step 2: Place V860 II into “Master Radio” mode.
To put V860 II into master, use the furthest right button (two arrows icon), until you see the “Radio” icon and the following screen on your flash:

Depending on flash, this might look a little different.
Step 3: Place your off-camera lights into “Radio Slave” mode.
To put the V860 II speedlight into “Radio Slave” mode, press the furthest right button (two arrows icon), until you see the “Radio” icon and “Slave” on your flash. (Step 2 in first section)
To put an AD200 into “Radio Slave” mode, press the Mode button until the same “Radio” icon appears on the top left.
Step 4: Make sure your channels match.
To change your “Master” V860 II’s channel, use CH button. This will allow you to change the channel you’re triggering on.
To change your “Slave” V860 II’s channel, use the CH button. (Section 3 in first section)
To change an AD200’s channel, press and hold the GR/CH button and use the scroll wheel to select.
Step 5: Assign “Master” and “Slave” flash a matching letter group.
On the V860 II [N] and [S], the on-camera flash will always be assigned to group “M”. This means your off-camera flashes should be set to groups “A”, “B” and “C”.
To assign your “Slave” speedlight to a Flash Group, press the “GR” Button until your designed group letter appears.
Step 6: Start shooting!
Press the test button (red indicator light) on your “Master” V860 II, your flash and off-camera flashes should now pop! If for some reason they aren”t communicating, reference the previous steps to ensure everything matches and is in the correct trigger mode.
Step 7: Adjusting power (if needed)
To change the flash power of a flash group, press GR button to select the appropriate group, then press the “Lightning Bolt” button until the desired group is highlighted. You can now use the scroll wheel to adjust the power.
As you begin your journey into the world of off-camera flash, it can be intimidating. We hope this article takes some of that fear away and helps you experiment freely!
Have any questions? Let us know in the comments below, or join our Facebook Community to connect with thousands of fellow photographers.


Have a question about off-camera flash and lighting? Check here first!